
Fragmentation of files in hard disk is one of the primary reasons for the system to become slow and buggy. It frequently happens due to when the system does not allocate enough space to store a single complete file in a single unite, but it distributes over different combines and in between different existing files. The gaps are left in between different files because of the deletion of a specific file or a random allocation of the space. It makes the whole process excessively slow over time because the system fetches a single file by picking it parts from different units. Unfortunately, we can not stop this from happening in the Hard Disks.
Fortunately, we could easily utilize file maintenance to defrag the hard disk and improve the overall system’s processing speed. The process of Defrangentation reduces the existing fragmentation by organizing the contents in a single unit and remove those gaps left in between the existing files. It helps the system locate and fetch content easily and quickly, and also it frees the unutilized spaces in the Hard Disk.
Defragmentation usually applies to the Hard disk because the Sold State Drive (SSD) works differently than traditional hard disks. However, if you have a Hark disk and the system takes more than usual time to load a file, you would like to check the status of your hard disk and defrag it to optimize the disks and improve the system health. Furthermore, the defragmentation also extends the drive’s life and performance.
Like Windows 7 and 8, Windows 10 periodically defrags the hard drives; however, it does not work most of the time consistently. If you use a hard drive( mechanical drive) and feel lags in the system and in fetching a file, you should manually defrag the hard drive to ensure a smooth and optimized experience. Here we will guide you through illustrated steps to Defrag your Windows 10 within few simple clicks.
How to Defrag Windows 10
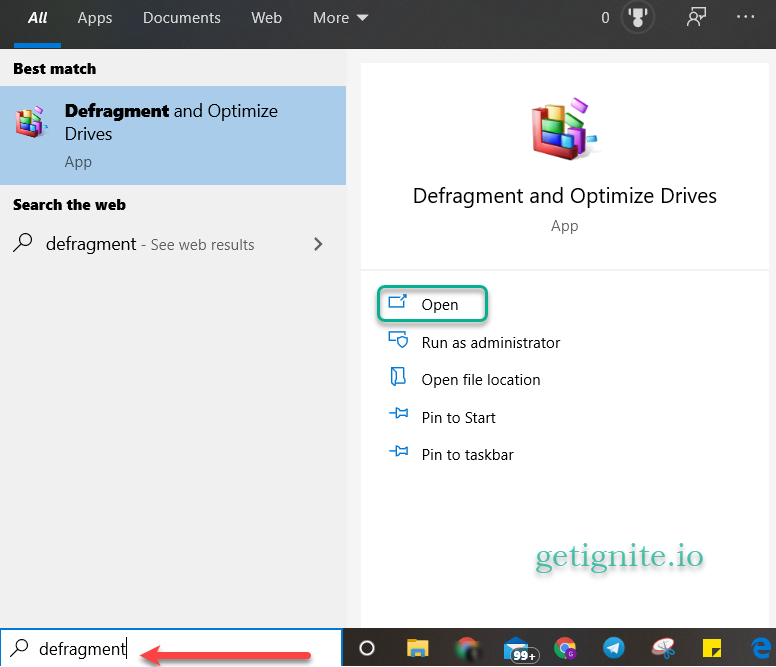
Step 1. Open the search windows in your Windows 10 and type “Defragment” and click on ‘Open‘ under the ‘Defragment and Optimize Drives‘ tab.
Step 2. On the next page, you can review the status of your Hard drive, you can typically see the current status has 0%, Click on ‘Analyze‘ tab to find the exact fragmentation status of your Hard drives.
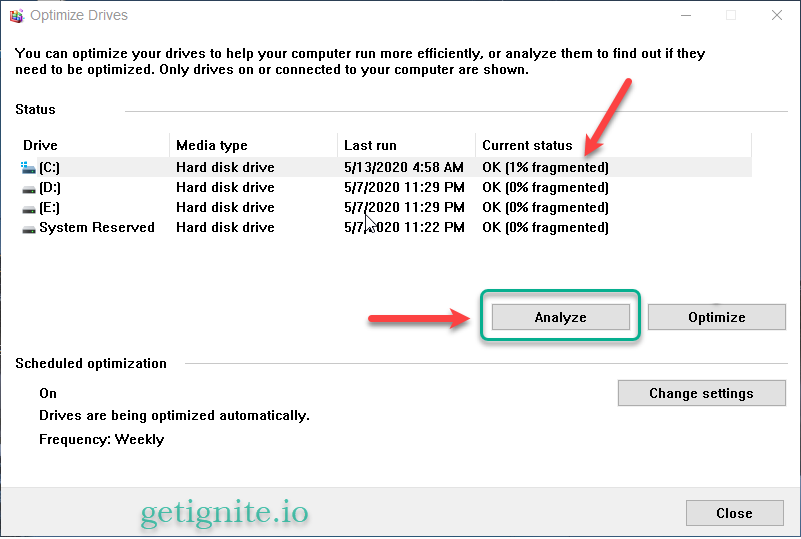
Step 3. You can now see the exact Fragmentation percentage of your Hard drive. It is advised to keep the fragmentation percentage within 5%, and you can keep it at 0% for the better performance.
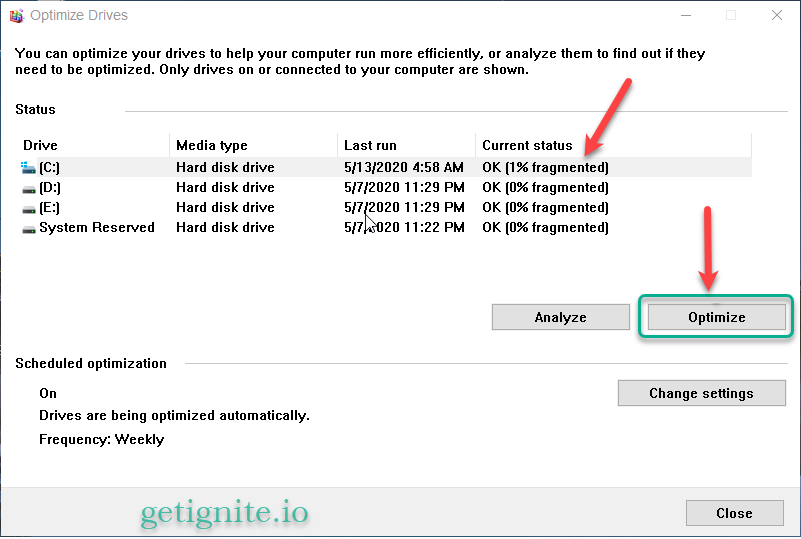
Now, if you want to initiate the defragmentation process, click on ‘Optimize“. It usually takes some time according to the fragmentation status, and hence it is advised to begin the optimization when you are not interacting with the files stored in Hard drive to ensure proper completion of this process.
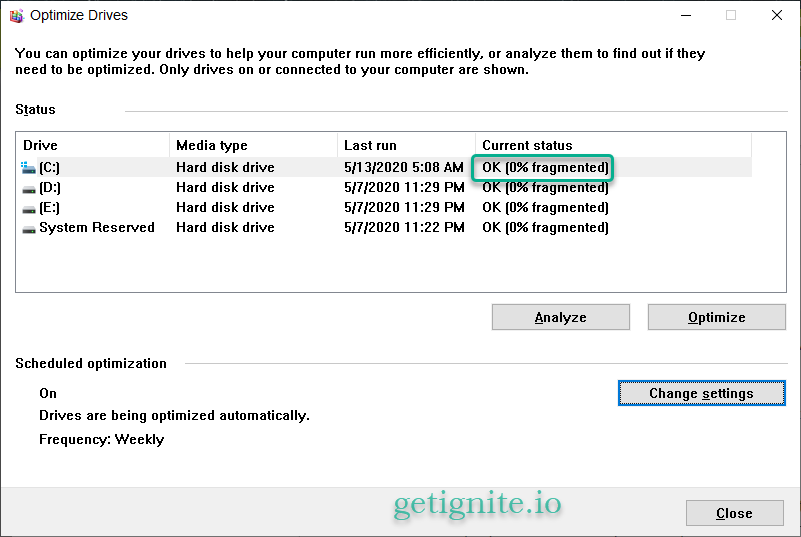
Step 4. Once the defragmentation process completed, you can see the fragmentation percentage is reduced to 0%. Now you can follow the same steps if your hard disk is divided into small portions. You can select each drive and follow these steps to defrag them.
Changing the frequency of the auto defragmentation process
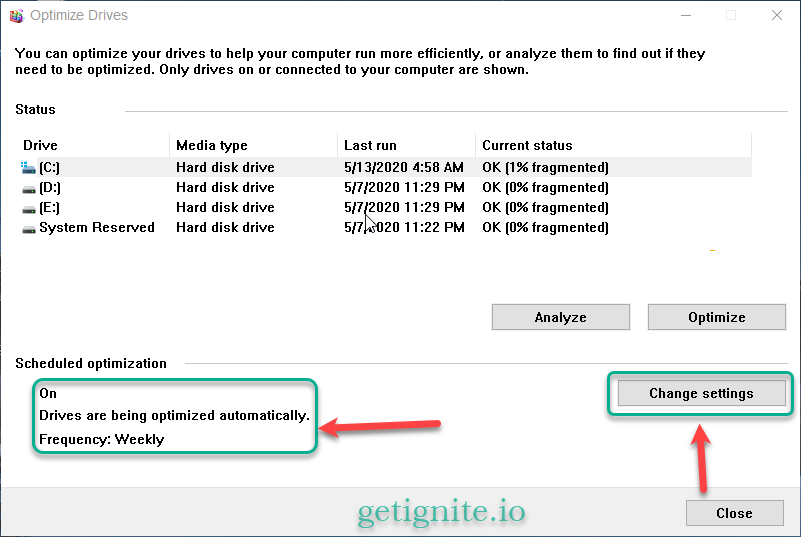
Usually, windows run this process on a monthly or weekly basis in the background, however, if this setting is turned off or you want to change the frequency from Monthly or Weekly, you can follow the below steps.
It is recommended to set the frequency of the auto defragmentation process as Weekly if your system starts running slow and laggy frequently.
Step 1. At the ‘Optimize Drives‘ page, you can view the current frequency or auto defragmentation, click on ‘Change Settings’ to make the desired changes.
Step 2. On the next page, you can view the frequency set for each drive (if your Hard disk had more than one part). Under the frequency tab, you set the initiation of the auto defragmentation process to ‘Daily,’ Weekly, and Monthly. And under the drives tab.
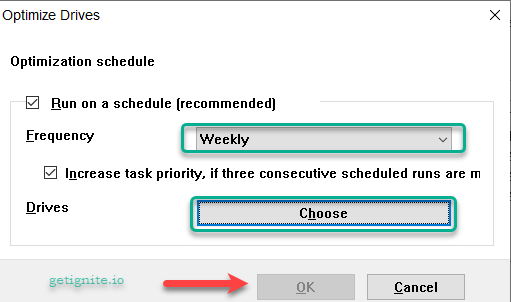
Once the changes are made, click on ‘OK‘ to save the updated settings.
Note: It is advisable not to defrag the SSD as it may reduce its lifetime and more unlikely to improve performance.
Advantages of Degfragmentation of Hard Drive in Windows 10
- Overall Speed Increase
- Creates more space to store data in a single drive
- Brings together the fragmented pieces to a single unit and significantly reduce the time to load a large file
- Improves the endurance and life of Hard drives
Frequently asked questions related to the Defragmentation of Hard Drive in Windows 10.
Can defragmentation cause problems?
Usually, this process does not harm the system or create any issues.
Will Defragmentation delete files?
Defragmentation does not delete any content stored in your Hard drive. Instead, it optimizes the disk drive for improved performance.
Can defragmentation harm my computer?
The defragmentation process solely utilizes your hard drive to takes different parts of a single file and store it together. It has no negative implications on the computer.
2 thoughts on “How to Defrag Hard Drive in Windows 10”
Comments are closed.